Last updated: August 12, 2026
Arthritis can make exercise feel like a bargain you did not agree to. A stiff knee, a sore shoulder, or hands that won’t cooperate changes the whole deal. This home workout equipment arthritis — complete guide focuses on tools that reduce joint irritation, improve consistency, and let you train around pain instead of through it. The goal is not “harder.” It is less joint irritation, better consistency, and tools that let you train around pain instead of through it.
Quick Answer: For most people, the best starting point is 1 seated cardio tool, 1 resistance tool, and 1 comfort/support item. In practice, that often means a recumbent bike or pedal exerciser, resistance bands with handles, and a stable chair or mat. When you have knee, hand, or shoulder arthritis, these are usually the safest first buys, but you should consult a clinician or physical therapist if your pain is severe, swelling is active, or balance is poor. Source: Arthritis Foundation, “Exercise and Arthritis” and the NHS guide to exercise for osteoarthritis.
Key takeaways
– 1 recumbent bike is often a better arthritis fit than an upright bike because it supports seated exercise.
– 3 categories cover most needs: seated cardio, light resistance, and comfort/support.
– Short sessions are often better than long ones when joints flare.
– Adjustable gear matters because arthritis symptoms can change day to day.
– Consult a professional if pain, swelling, instability, or grip loss is significant.
I’m going to answer the question that matters most: what home workout equipment is actually worth buying for arthritis, and how do you choose it for your joint symptoms, space, and budget? Painful knees, stiff hands, sore shoulders — or all three at once — can make the wrong purchase flare you up fast. The right setup gives you a way to keep moving on the days you would otherwise skip it. Honestly, that practical fit matters more than brand names or fitness trends. Source: CDC physical activity guidance for adults with arthritis.
The first decision: what kind of arthritis problem are you solving?
Start with the joint, not the catalog. What hurts? What movement sets it off? Is the main issue pain, stiffness, weakness, or fatigue? Those details decide the equipment, and generic “best home gym” advice usually misses the mark. A cardio machine can be fine for one person and miserable for another; the same goes for strength tools and grip-heavy gear.
With knees or hips, I would begin with low-impact cardio and seated strength work. With hands, fingers, or wrists, I would favor larger grips, loop bands, ankle cuffs, and machines that do not require a tight squeeze. With shoulders, I would look for equipment that keeps the arms below shoulder height and avoids overhead force.
So the limiting joint comes first. That is the whole trick. Arthritis exercise is not about proving toughness; it is about keeping the joint moving with the least aggravation.
Here is a quick map of common situations:
| Situation | Best Path | Why Other Options Fail |
|---|---|---|
| Knee arthritis with pain on stairs | Recumbent bike, mini stepper only if tolerated, chair-based strength | Running, jumping, and deep squats can spike joint stress |
| Hand arthritis with grip pain | Resistance bands with comfortable handles, light dumbbells with thick grips, pedal exerciser | Small handles, pull-up bars, heavy free weights that demand strong grip |
| Shoulder arthritis with overhead pain | Seated rowing motion, chest press bands, wall-supported work | Overhead presses and fast arm cycles can irritate the joint |
| General stiffness and low stamina | Under-desk pedal exerciser, walking pad if balance is good, recumbent bike | Equipment that feels “intense” tends to be abandoned |
| Balance problems plus arthritis | Chair-based equipment and stable seated machines | Standing-only tools increase fall risk |
A practical first setup usually includes:
1. A stable chair with a firm seat and arm support if you need it.
2. A light resistance band set with handles.
3. A recumbent bike or pedal exerciser if lower-body motion feels good.
4. A pair of light dumbbells or adjustable hand weights with a comfortable grip.
5. A yoga mat or thick exercise mat for floor comfort.
6. A timer or simple interval app so you can pace yourself without guessing.
Only one thing to buy? Then pick the piece that removes your biggest barrier. When pain stops you from starting, buy comfort and stability first. If boredom is the issue, choose something you will actually use every week.
Quick check: if you know which joint flares first and which movement sets it off, you are ready to choose equipment by function instead of by trend.
Home workout equipment for arthritis: what earns a place in the house
Short version: I would prioritize low-impact cardio, light resistance, and support gear before anything fancy. For home workout equipment for arthritis, that usually means recumbent bikes, pedal exercisers, resistance bands, light dumbbells, and a few joint-friendly accessories. The wrong buy is often the one that looks like a full gym but asks too much from painful joints.
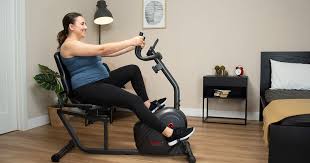
A recumbent bike is often the most forgiving cardio machine for people with knee, hip, or balance issues because the seat supports you and the pedal motion is smooth. A pedal exerciser is cheaper and smaller, but it can be less stable and may slide unless you place it carefully. Resistance bands are useful because you can adjust effort without loading the joints with heavy weight. Light dumbbells help with functional strength, but only if grip is manageable. An exercise mat matters more than people expect; if getting on the floor hurts, you will skip the work entirely.
I would not treat these as automatic buys without checking your symptoms and, when needed, consulting a clinician or physical therapist:
– Heavy kettlebells
– Fast-paced jump training
– Small, hard grip accessories
– Anything that forces repeated deep knee bending if your knees hate that range
– Overhead systems if shoulders are a problem
A useful rule: if a tool requires you to brace hard, grip hard, or move fast to make it work, it is usually not the first arthritis buy. When you are unsure, consult a professional who knows your joints and movement limits. Source: Arthritis Foundation exercise guidance.
A good home setup can be very simple:
– Cardio: recumbent bike, tabletop pedal exerciser, or walking pad
– Strength: resistance bands, light dumbbells, ankle weights, chair sit-to-stand practice
– Mobility: foam roller, yoga strap, mat
– Comfort and control: timer, mirror, stable chair, grip aids
Shopping for a machine? Think about entry and exit as much as exercise. A device that feels fine once you are seated but is awkward to climb onto is not a win. That is one reason recumbent bikes often beat upright bikes for arthritis. The seat is easier. The posture is easier. The whole thing asks less from joints that already complain.
Cheap gear can be noisy, unstable, or just awkward, and awkward gear gets ignored. Brutal, but true. I would rather own one or two tools that feel safe than six that live in a corner.
Quick check: if you need equipment that reduces joint strain rather than just burns calories, your shopping list should be low-impact, adjustable, and easy to use on sore days.
If your knees are the problem, choose support before intensity
Knee arthritis changes the order of operations. Keep the joint moving, yes, but do not force deep bend, impact, or twisting. Once the knees are swollen, unstable, or painful on stairs, standing cardio stops making much sense and seated or guided motion becomes the better bet.
For knee pain, I would usually start with:
– Recumbent bike
– Pedal exerciser
– Chair sit-to-stand practice
– Mini bands for hip and glute work
– A firm chair and step-free space
Why? Strong hips and controlled leg muscles can share the load with the knees. But the knee itself usually hates sudden impact and loaded twisting.
A step-by-step path that usually makes sense:
1. Put the bike or pedal exerciser where you can reach it without trip hazards.
2. Start with a seat height that lets your knee stay comfortable through the pedal circle.
3. Use short sessions first. Stop before the knee gets angry, not after.
4. Pair cardio with a few minutes of seated leg work or band work for hips and thighs.
5. Increase time before resistance. Gentle motion often helps more than “pushing harder.”
6. When swelling rises after sessions, reduce range, resistance, or duration next time.
7. Keep a simple log of what your knee tolerated. Pain patterns are useful data.
Good support tools for knee arthritis:
– Recumbent bike: best for steady motion and seated support
– Under-desk pedal exerciser: useful if space is tight, though it can feel less natural
– Loop resistance bands: good for side steps, clamshells, and seated leg work
– Seat cushion or gel pad: helpful if sitting itself is uncomfortable
What fails here:
– Jump ropes
– Step aerobics
– Fast treadmill running
– Deep squats done for “burn”
– Anything that makes you twist on a planted foot
If your knee pain improves after warm-up, that is a clue seated motion may fit. When it gets worse as you continue, the load is too high, the range is too big, or the machine is wrong. Not a character flaw. Just data.
One trade-off: a recumbent bike takes up more space and costs more than a pedal exerciser. Still, if room allows, it is often more comfortable and more likely to get used.
Quick check: if stairs, deep bends, or impact make your knees complain, a seated cardio setup plus hip and thigh strength work is the right lane.
If your hands, wrists, or fingers hurt, grip is the enemy
Hand arthritis changes the game. Anything that depends on a hard squeeze can be the wrong move. When the small joints are the problem, the better route is larger handles, strap-based tools, and movements that let the hand stay relaxed.
I would look for:
– Resistance bands with padded or loop handles
– Light dumbbells with thick grips
– Wrist-friendly straps or cuffs
– Foam grip sleeves
– Pedal exercisers with easy-to-turn knobs or simple controls
The win here is simple: less grip demand. A lot of people buy hand weights that are too small and too slick. That makes the fingers tense up just to hold the weight, which defeats the purpose.
A better path:
1. Choose tools with larger diameter handles or add foam grip sleeves.
2. Avoid squeezing hard for long periods.
3. Use bands for pulling and pressing movements instead of heavy dumbbells.
4. When you need to hold a weight, keep it light enough that your hands stay relaxed.
5. Try wrist-neutral positions. Bent wrists often aggravate hand pain.
6. Shorten the session before the fingers start to ache or stiffen.
7. If swelling is a pattern, use exercise when the hands are less inflamed, not when they are already flared.
Useful tools for hand arthritis:
– Thick-grip dumbbells or grip sleeves
– Resistance bands with handles
– Door anchors for bands, if setting them up is easy
– Wrist braces for support during daily activities, if recommended by a clinician
– Seated cable-style pulls with bands, which let the hands stay more neutral
What tends to disappoint:
– Pull-up bars
– Heavy free weights with thin handles
– Rowers that demand a strong squeeze
– Small hand exercisers that seem therapeutic but can irritate inflamed joints
– Anything that requires repeated forceful opening and closing of the hand
When your hands are stiff in the morning, I would not make that your main training window. Warm them up first. If the joints are hot, swollen, or newly flared, back off and use gentler movement. Arthritis training should not punish the very joints you are trying to preserve. And if symptoms are severe, consult a clinician or hand therapist before adding resistance work. Source: NHS hand and wrist arthritis advice.
The trade-off is that band work can feel “less serious” than weights. It isn’t. Often, it is the smarter choice when grip is the bottleneck.
Quick check: if opening jars, carrying groceries, or gripping a dumbbell hurts more than the exercise itself, you need larger handles and less squeeze, not heavier equipment.
If your shoulders hurt, keep the arms below the danger zone
Shoulder arthritis usually punishes overhead pressing and aggressive arm cycling first. When pain rises as your arm goes above shoulder level or reaches behind you, the better path is supported, chest-level, and seated work.
I would look at:
– Seated row motions with bands
– Chest press bands
– Recumbent bike with minimal arm load
– Light dumbbells for front-of-body work only if tolerated
– Wall-based mobility drills
– A mirror or door frame for controlled movement feedback
The shoulder often hates sudden end-range force. So the equipment should keep you in a comfortable arc, not drag you into painful positions.
A simple progression:
1. Start with chest-level band pulls and presses.
2. Keep elbows closer to the body rather than flaring wide.
3. Avoid long holds with arms raised.
4. Use light resistance and perfect form before adding load.
5. Stop any movement that pinches at the front or top of the shoulder.
6. Build volume slowly if pain stays calm after the session.
7. When reaching overhead hurts for daily life, skip overhead training for now.
What works best:
– Resistance bands anchored low or mid-height
– Seated rowing with bands
– Light arm raises only in the pain-free range
– A stable chair with back support
– Gentle mobility tools like a strap or towel
What usually fails:
– Overhead presses
– Fast jumping jacks
– Heavy overhead kettlebell work
– Wide-grip pushing motions
– Any machine that forces the shoulder into a painful end range
One honest limitation: shoulder arthritis can be stubborn. Home equipment helps, but it does not fix structural problems by itself. When motion is sharply limited, when pain is worsening, or if the joint feels unstable, a physical therapist or clinician should be part of the plan.
Quick check: if reaching for a shelf is worse than pushing something at chest height, your equipment should stay low, supported, and controlled.
The 3 conditions that change everything
Still undecided? These three factors should change your answer fast: pain flare level, balance risk, and hand function. If any one of them is high, the standard “buy a bike and some dumbbells” advice can be wrong.
1) You are in an active flare
When a joint is hot, swollen, or more painful than usual, your best equipment is the simplest equipment: gentle motion, maybe a pedal exerciser, and nothing that requires strain. But with a strong or persistent flare, the correct move may be to reduce exercise load and talk with your clinician before pushing ahead. Source: Arthritis Foundation and CDC guidance on arthritis exercise.
2) You feel unsteady standing
Balance trouble makes standing-only equipment a bad bet. A recumbent bike, seated bands, or chair-based training is safer. But if you feel steady and you want walking-based cardio, a walking pad or treadmill might make sense later.
3) Your hands cannot grip well
When grip is the main obstacle, free weights and bars lose to cuffs, bands, and machines with bigger handles. But if your grip is fine and your main issue is knee pain, you can widen your equipment choices.
Here is a practical decision table:
| Situation | Best Path | Why Other Options Fail |
|---|---|---|
| Joint flare is active | Gentle motion only, short sessions, low resistance | “Push through it” often increases irritation |
| Balance is shaky | Seated equipment and chair-based strength | Standing tools increase fall risk |
| Grip is weak or painful | Bands, cuffs, thick handles | Thin bars and heavy dumbbells force too much squeeze |
| You tolerate motion but not load | More movement, less resistance | Heavy training can backfire |
| You tolerate load but not impact | Strength equipment, no jumping | Impact magnifies joint stress |
A good purchase sequence usually goes like this:
1. Solve safety first.
2. Solve the most painful joint next.
3. Buy the simplest tool that lets you train twice a week.
4. Only then add variety.
That order avoids the classic mistake of shopping for the body you wish you had instead of the one you are living in now. When you are unsure how hard to start, consult a professional and follow a plan that matches your pain, balance, and joint history. Source: Arthritis Foundation exercise recommendations.
Quick check: if your pain changes day to day, your equipment needs to be adjustable, seated, and easy to dial down.
How to build a joint-friendly home setup without wasting money
Buying from scratch? Then the smartest setup is not a “home gym.” It is a small set of tools that cover cardio, strength, and recovery without irritating the same joint in the same way every day. But if money or space is limited, fewer pieces with more versatility wins.
I would build in this order:
1. One seated cardio option: recumbent bike if you have room and budget; pedal exerciser if you do not.
2. One resistance option: a band set with handles and door anchor.
3. One comfort item: mat, cushion, or chair that helps you start.
4. One light load option: dumbbells or ankle cuffs if your grip and joints allow it.
5. One way to track time and effort: timer, watch, or phone app.
Why this order works:
– Cardio gets stiffness moving.
– Resistance helps preserve muscle around painful joints.
– Comfort keeps you consistent.
– Light load gives you progression without jumping to heavy weights.
– Tracking prevents the “I guess I should do more” trap, but if pain, fatigue, or flare-ups are unpredictable, consult a clinician or therapist before using tracking as a target. Source: NIH and Arthritis Foundation exercise self-management guidance.
If you have to choose between a nicer machine and a reliable routine, I’d pick the routine. A perfect setup that stays unused is just furniture.